

Have you recently been asked to sign a non-disclosure agreement (NDA) or a rent agreement in a Word document? You may print it, sign it with a pen, and scan it using a printer to return it. However, this is a time-consuming and inefficient method of doing tasks. We offer a more advantageous solution. You may open the document in Microsoft Word on either a PC or a Mac and add a signature digitally. This is how you do it.
Add Signature In Microsoft Word
There are 3 ways to add a signature in Microsoft Word. Let us examine each of them.
1. Use The Drawing Tool
Microsoft Word includes an integrated drawing tool that allows you to doodle on a Word document. Using the drawing tool, one can draw a digital signature and add it anywhere in the Word document. To do so, follow the steps below:
1 – In Microsoft Word, open the document you wish to sign.
2 – From the menu bar above, select Draw.

3 – Choose the Pen tool you want to use to sign a document.
4 – You can click on the little down arrow beside the pen and change the thickness of the pointer, color, and even add glittering effects (irrelevant here).
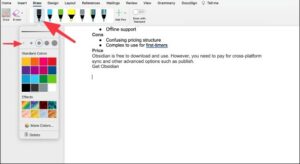
5 – For optimal results, use a thinner pointer and choose Black, Green, or Red color.
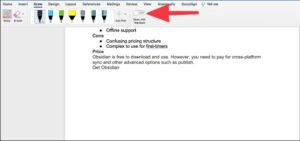
Here, we’re going to use the trackpad to sign a document. Attempting the same procedure using a mouse will provide ineffective results. So instead, toggle on the Draw with Trackpad option.
6 – Now, It will open a little dialog box. Use 1 finger to add a signature. Then, use 2 fingers to change the position. And lastly, press any key to exit the preview.
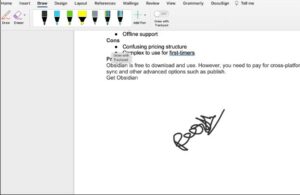
Using the drawing tool will not produce the professional result you desire. Instead, you must utilize a built-in add-on for Microsoft Word to sign a document to accomplish this.
2. Use Third-Party Add-ons
You may sign a document in Word using third-party add-ons such as Adobe Sign, DocuSign, or Panda Sign. DocuSign is one of the most widely used document signing services available. Let’s see how to include it in Microsoft Word.
1 – In Microsoft Word, open the document you wish to sign.
2 – Choose Insert > Get Add-ins.
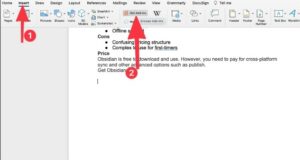
3 – Here, It will open the Add-in store inside Microsoft Word. Now, Search for DocuSign and install the add-in in Microsoft Word.

4 – Choose the Add-in and create a DocuSign account.
5 – Select DocuSign from the menu bar whenever you wish to sign a document.
6 – Now, Click on Sign Document, and DocuSign will upload the document to the cloud and open the default interface to sign a document.
You may use this section to sign documents, add initials, a stamp, text, a check box, and even a company document.
You may leverage the same signature across many services by utilizing a third-party add-on. We mention all services here because DocuSign is integrated as a mini-app into various other apps, including Google Docs, Microsoft Word, Zoom, and even Microsoft Teams. The goal is to be able to sign a document without having to leave the present interface.
3. Add Image Signature
If you’ve saved your signature with a white background on your PC as a PNG or JPG file, it’s time to insert it into the Word document.
1 – Open the Word document that you want to sign.
2 – Choose Insert > Picture > Picture from File.
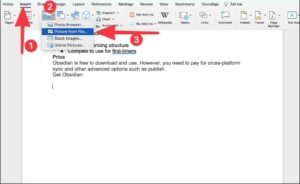
3 – From the device, select the image and insert it into the Word file.
4 – Now, Resize the image and place it at a relevant place in the file.
However, this is a temporary fix. For example, if the document’s background is a different color, the image signature with a white background appears unprofessional and out of place. To achieve a better finish, you need to eliminate the unsightly background.
Conclusion: Add Signature In Microsoft Word
The methods outlined above will save you much time determining how to swiftly and easily add a signature to Word documents. Our preferred option is the second one, which involves using third-party add-ins. You may also use the sketching tool if you precisely figure out how to add a signature using the trackpad.


