

The absence of a Print Screen key on the MacBook is an annoyance for new Mac users who have just switched from Windows background. They always have a question in their mind that, “How to Take Screenshot on Mac.” As a response, we’ve listed the procedures to Print Screen or Take Snapshot on Mac below.
Take A Screenshot On Mac
MacBooks, unlike Windows PCs, lack a separate Print Screen Key and will not accept it, even though you connect a Windows keyboard to your Mac. As a result, only one way to Print screens or Take Screenshots on a Mac is to use Apple’s macOS software’s Shortcut Keys. macOS dedicated Keyboard Shortcuts give more capability than Windows Print Screen Function, enabling users to take the screen or a specific part of the display.
For instance, pressing Command + Shift + 3 takes a Snapshot of the full Mac screen, whereas pressing Command + Shift + 4 takes a Snapshot of a specific display section.
If you have dual displays, you can also capture a snapshot of both displays by pressing Command + Shift + 3.
How To Take Screenshot On Mac Of The Entire Screen
To Take a Screenshot on Mac of your Mac’s complete display or Desktop, follow the instructions below.
1- On your Mac’s keyboard, press Command + Shift + 3 keys.

When you press the aforementioned keyboard shortcut, your Mac’s full display will be captured in a Screenshot, which will be stored as a (.PNG) file on the MacBook’s Desktop.
2- If necessary, right-click on the generated Snapshot File and rename it with something that accurately represents the Screenshot’s information.
How To Take Screenshot On Mac Of A Selected Area
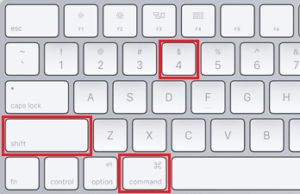
Using the Command + Shift + 4 keyboard shortcut, you may Take a Screenshot on Mac of any Tweet, Photo, or section of an article appearing on Twitter or any other blog.
1- When you press the Command + Shift + 4 keys on your Mac’s keyboard, the mouse cursor will change to Crosshair mode right away.
2- Select the portion or area of the screen that you wish to capture in the Screenshot with the Mouse or Trackpad, then release the mouse key.
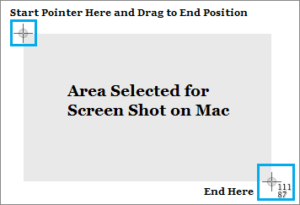
3- You’ll hear the shutter sound when you leave the Mouse key, and Screenshot will be stored as a (.png) file on your MacBook’s Desktop.
Print Screen To Clipboard On Mac
Well, When you Take a Screenshot on Mac, it is also saved to the Clipboard. So you can now paste the snapshot into Microsoft Word, Excel, and many other programs.
1- On your Mac’s keyboard, press Command + Control + Shift + 3 keys.
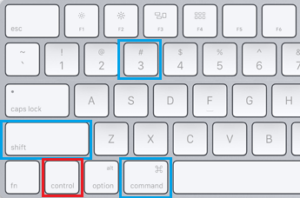
2- The snapshot of your Mac’s screen or Desktop will be stored to the Clipboard, and you may paste it into any app using the Command + V combination.
Saving Selected Portion To Clipboard
Similarly, taking a Screenshot of a particular section or region of the display saves the image to the Clipboard, which may be inserted into any document, spreadsheet, or application.
1- When you press the Command + Control + Shift + 4 buttons on your MacBook’s keyboard, the mouse will switch to Crosshair mode.
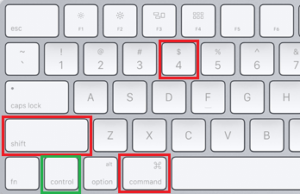
2- Select the particular display portion that you want to save in the snapshot with the Mouse or Trackpad, then release the mouse button.

The Snapshot sound will play instantly, and the screen capture will be stored in your Mac’s Clipboard. To paste the snapshot into any application on your Mac, press Command + V on your keyboard.
Also, Check :


