The internet is everything today, from basic word searches to watching your favorite movies. We may use WiFi to access the internet without using cords because of wireless connectivity. However, there are instances when you have troubles with your network connection, and it may be aggravating if you can’t get it to work immediately. Several customers have recently reported that they can connect to their wireless connections without internet access. There are a few things to consider regarding network connection troubles on Windows 10. In this scenario, we decided to produce an in-depth guide that will guide you on resolving the issue of your WiFi connected but no internet access on Windows 10. Let’s get this party started, shall we?
How To Fix WiFi Connected But No Internet Access Problem?
Try Other Devices
If you are experiencing no internet access error in Windows 10, check your other devices to see if they can connect. This lets you quickly determine if the issue is with your ISP (Internet Service Provider) or your Windows 10 device. Examine your smartphone or tablet and use your browser to access a few websites. If your WiFi connection works correctly on your other devices, it is reasonable to conclude that the issue is with your computer. To get a guide on what to do with your computer, go to method 3. However, if you cannot access the internet on all your devices, the issue may be with your router or ISP. To troubleshoot your network work connection in this scenario, proceed to the following method below.
Check Internet Connection
Internet service companies frequently supply routers. Check your router to see whether all the light indications work normally if you have connection problems. A router usually has a flashing red light if something is wrong. In this scenario, you should restart your internet router. Locate and disconnect your router’s power cable, which is normally situated at the back.
Now, wait 5 to 10 seconds before disconnecting the power connection to your router to switch it on. Wait for the router to completely restart before reconnecting to your wireless connection. No, try to browse a few websites to verify if the WiFi is connected. If, on the other hand, you’re still unable to access the internet on all of the devices, it is preferable to call your ISP and report the issue with their internet service.
Restart Computer
Network connection troubles in Windows 10 are frequently caused by a transitory flaw in the operating system, which causes some operations, such as wireless networking, to fail. To remedy this issue, try restarting the computer to allow your operating system to reload all its resources and drivers. To correctly restart Windows 10, follow the steps below as a guide.
- To begin, press the Windows key on the keyboard to launch the Start menu.
- To open the option menu, click No W and the Power button.
- Finally, click Restart to restart your operating system.
Wait for Windows 10 to boot up, then reconnect to your network to check whether the WiFi is connected, but no internet access on the Windows 10 WiFi issue has already been fixed.
Run Network Troubleshooter
Windows 10 includes built-in tools for troubleshooting system problems on your computer. The network troubleshooter is a valuable tool you may run on your system to diagnose the no internet access issue in Windows 10. Follow the instructions below to run the network troubleshooter on your computer.
- Press the Windows + I key on the keyboard to open Windows Settings.
- Click Update & Security in the Windows Settings menu.
- Then, from the side menu, click the Troubleshoot option. Now, click Internet Connections under the ‘Get Up and Running’ page.
- Finally, click Run the troubleshooter and follow the on-screen steps to use your computer’s network troubleshooter.
To proceed, click the ‘Apply this Fix’ option if the troubleshooter recommended a viable solution to your problem. After that, restart your computer and try to browse the internet again to check whether the issue with your internet access has been repaired.
Check IP Address Settings
IP addresses are unique identifiers for all internet-connected devices. If your computer’s IP address is not properly established, network systems will not recognize your device, which describes the ‘WiFi connected but no internet access’ issue in Windows 10. Make sure your IP address is acquired automatically to resolve this.
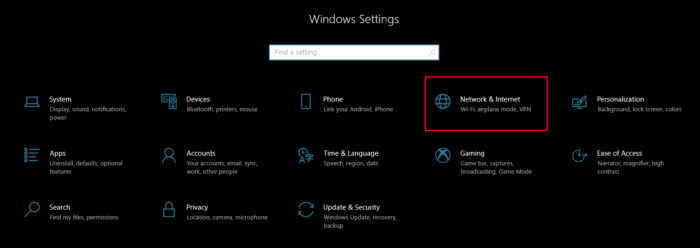
- First, press Windows + I on your keyboard to open Windows Settings.
- Then, tap Network & Internet.
- Tap Change Adapter Options in the Network & Internet section.
- Now, right-click your wireless network and choose Properties.
- Locate and double-click Internet Protocol Version 4 (TCP/IPv4) inside Properties.
- Finally, ensure that the option ‘Obtain an IP Address Automatically’ is chosen. To save the changes, click OK.
After making the adjustments, restart your system and try to access the internet via your WiFi again to check whether the problem has been fixed.
Execute Winsock Command
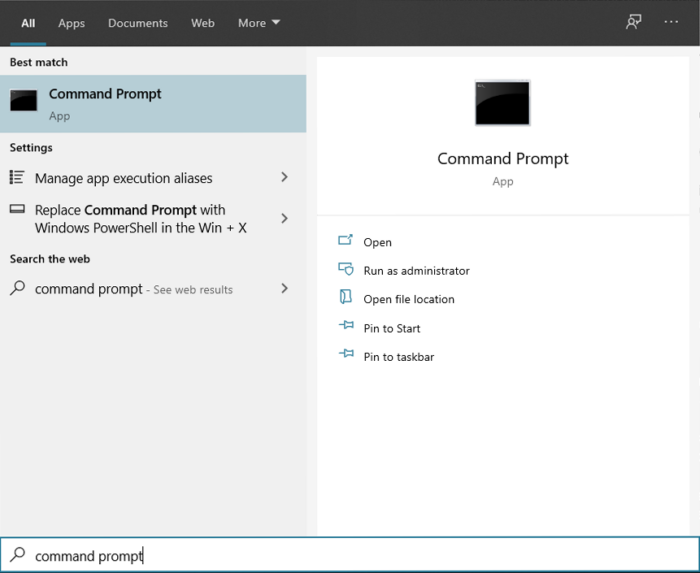
Winsock reset is a Windows 10 command that aids the operating system in recovering from any socket errors that may have happened when using your network connection. To run the Winsock command on your computer, you must first launch Command Prompt.
- Search for Command Prompt on your computer by pressing Windows key + S on your keyboard.
- Then, to open it, click Run As Administrator.
- Type the following commands one at a time into the Command Prompt, then press Enter.
netsh winsock reset
netsh int ip reset
- Finally, after running the commands, exit Command Prompt and restart your computer.
After Windows has restarted, try using your WiFi connection to access the internet again to check whether the problem persists with Windows 10. On the other hand, if you continue to receive a ‘WiFi connected but no internet access’ issue on Windows, proceed to the next method below to connect and resolve the issue.
Renew IP Address
As previously stated, your computer’s IP address is critical while connecting to the internet. In this scenario, you can try renewing your IP address so that your ISP can provide your computer with a working IP address. Check out the step-by-step guide below for instructions on how to accomplish this.
- First, press Windows + S on your keyboard and search for Command Prompt.
- Following that, click Run As Administrator to launch CMD with administrator rights.
- Type the following commands one at a time and press Enter after each line in Command Prompt.
ipconfig /release
ipconfig /renew
- After that, restart your computer.
Please wait for your computer to boot completely before attempting to access the internet via your WiFi connection to check whether it works correctly.
Flush DNS
If renewing your IP address does not fix your network connection issue, you might try flushing your DNS. Domain Name System, or DNS, is another critical component of your network that is used to convert IP addresses of websites into domain names such as google.com. Check out the below guide to flush your DNS.
- To begin, reopen Command Prompt on your computer.
- Now, Enter ipconfig /flushdns followed by the Enter key on the keyboard within the Command Prompt.
- Finally, shut off the Command Prompt and restart the computer.
After restarting the computer, go back to your browser and try to access a few sites using your WiFi connection to check whether the no internet access issue has been repaired.
Use Google’s DNS Server
Your ISP’s DNS server may have problems, so clearing it will not work on your computer. If so, you can restore internet access on your computer using Google’s DNS server. Follow the guide below to use Google’s DNS server.
- To open the Quick Access Menu, press and hold the Windows key + X on your keyboard.
- Then, click Network Connections.
- Click Change Adapter Options inside Network Connection Status.
- Now, right-click on the current Network Adapter and choose Properties.
- Now, Double-click Internet Protocol Version 4 (TCP/IPv4) in the pop-up box.
- Click ‘Use the Following DNS Server Addresses’ and enter the following values.
Primary DNS Server: 8.8.8.8
Alternate DNS Server: 8.8.4.4
Save the adjustments and try accessing a few websites using your WiFi connection to see whether it works properly.
Update Network Drivers
If your wireless connection isn’t working properly, your network drivers may cause the issue. If your system has an outdated driver, it might cause software compatibility difficulties, which describes the ‘WiFi connected but no internet access’ problem. Follow the steps below to make sure your network drivers are current.
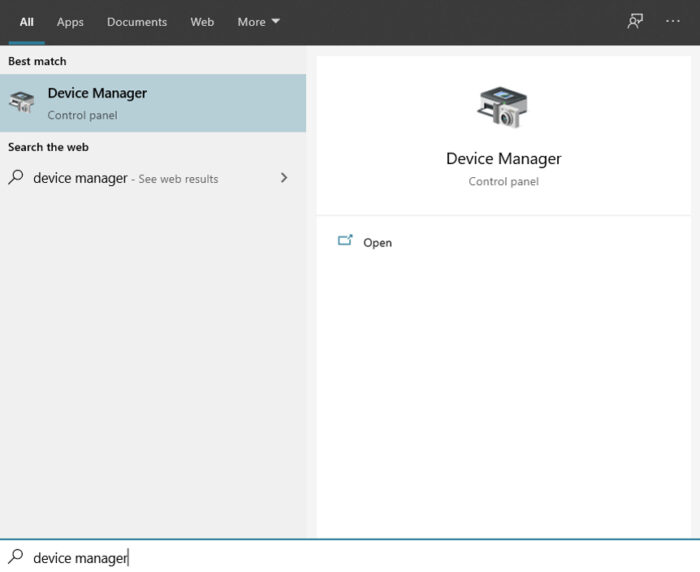
- Press the Windows key + S to search for Device Manager on your keyboard.
- Then, to launch it, click Open.
- Click Network Adapters to expand it in Device Manager.
- Now, right-click your wireless network adapter and select Update Driver from the menu that appears.
- Ultimately, click ‘Search Automatically for Updated Driver Software’ and proceed with the update by following the on-screen prompts.
Restart the computer and reconnect to your wireless network after the update to verify that the problem has been repaired. However, if you are still experiencing troubles with your WiFi connection, move to the next method below to try to resolve the issue.
Check For Windows Update
The wireless connection problem on your system might be caused by an operating system bug that causes other functionalities, such as the wireless connection, to fail. In this scenario, you can check whether an update to your operating system is available to fix the software bug.
- First, press Windows + I on your keyboard to open Windows Settings.
- Tap Update & Security in the Windows Settings menu.
- Finally, from the side menu, click the Windows Update tab. This will cause your system to check for any available operating system updates. If an update is available, follow the on-screen instructions to download and install it on your computer.
To check if your wireless network is already working after updating Windows, restart your computer and try to access the internet using the WiFi once more.
Reset Network Settings
You can try the last method by resetting your network settings. You may have accidentally modified some of your system settings, resulting in the ‘WiFi connected but no internet access’ error. Rather than looking for the wrong settings, reset your network settings to ensure they are set to factory default.
- First, press Windows + I on your keyboard to open Windows Settings.
- Then, tap Network & Internet.
- Finally, choose Network Reset and then click the Reset Now option.
Continue with the operation by following the on-screen directions. To check if the no internet access problem has already been fixed, access the internet again using your WiFi connection.
Conclusion:
This concludes our guide on resolving WiFi connected but no internet access problem. Suppose you continue to have problems with your wireless connection. In that case, we recommend you go to your region’s local service facility and have them check your network card for any hardware problems.


